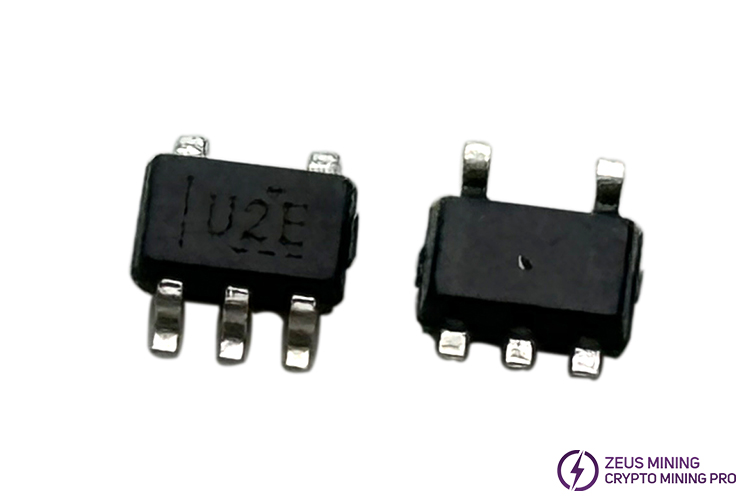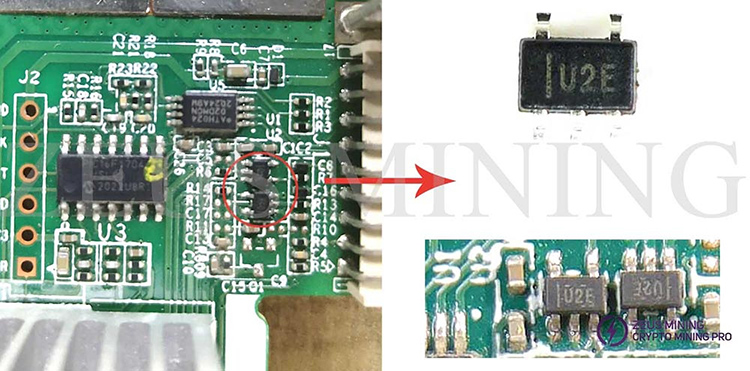


For Antminer S19 hash board, the SN74AUP1T34DCKR chip is an efficient voltage-level converter chip located at positions U1 and U2, marking the U2E silk screen. It can be used for most of the Antminer 19 series machines, and can also be used for Iceriver KS3M KS3L and KS5L hash boards. It adopts SC70-5 packaging technology, highly integrated on the PCB board. With two independent configurable power rails and a wide supply voltage range of 0.8 to 3.6V, it effectively regulates the input voltage to match the hash boards' operating range, ensuring efficient mining. Additionally, it is fully compatible with partial power-off applications using loff, preventing damage to components from current backflow during power outages.


When the SN74AUP1T34DCKR chip fails, the hash boards may be affected by fluctuating voltages, leading to abnormal hash rates, frequent restarts, crashes, or unstable operation, thereby impacting overall mining efficiency. If not replaced promptly, it may cause irreversible damage to other electronic components, further exacerbating losses. Therefore, upon detecting a faulty chip, immediately replace it with a new spare to restore the machine's normal operation, ensuring miner profitability.
How to replace the SN74AUP1T34DCKR chip for Antminer S19 hash board?
1. Shut down the miner, disconnect the power cord from the socket, remove the protective cover plate above the control board, unplug the cables connected to the hash boards and fan plugs, then unscrew the fixing screws of the conductive copper sheets. Subsequently, remove the outlet cooling fans and their baffle.
2. Take out the faulty hash board from the chassis, then remove dust from its surface with a cleaning brush.
3. Use a multimeter to test the chip pins' voltage to locate the faulty one.
4. Apply flux around the faulty chip's pins, set the hot air gun to approximately 400°C, select the second gear wind speed, next, aim it 5cm above the chip to melt the solder. Use tweezers to remove the chip carefully.
5. Quickly cool the hash board using a PCB cooling fan, then use circuit board cleaning liquid to clear residual solder and flux from the board.
6. Inspect the new SN74AUP1T34DCKR chip for any visible damage. Align its pins with the hash board's pad, then apply an appropriate flux. Subsequently, reheat with the hot air gun. Stop heating when the solder wraps around the chip pins, forming shiny and full joints. Press the chip with tweezers until the solder solidifies, ensuring a secure connection.
7. Inspect the soldering of the new chip's pins and use a multimeter to test the voltage across the pin ends, confirming a successful replacement.
8. Insert the hash board back into the chassis along the slot, after that tighten the fixing screws of the conductive copper sheets.
9. Install the outlet cooling fan, connect the corresponding cables, next align the protective cover plate with the screw holes to secure it. The replacement is complete.
10. Power on the miner to observe its operation and confirm through its backend logs if the hash rate has returned to normal.
By following these steps, we can easily replace the faulty SN74AUP1T34DCKR U2E chip on the Antminer S19 miner's hash board, restoring normal mining and preventing further losses caused by the failure.
Dear Customers,
Hello, April 4, 5 and 6, 2025 (GMT+8) are the traditional Chinese festivals - Qingming Festival. Our company will suspend shipments during these 3 days and resume shipments on April 7 (GMT+8). We are deeply sorry for the inconvenience. Thank you for your understanding and support.
Best wishes,
ZEUS MINING CO., LTD